Defects in plastic manufacturing can take various forms, depending on the types of materials and processes used.
Some of the most common defects in plastic molding include warping, sink marks, flash, voids, and contamination. Factors such as the injection mold & part design, fluctuating temperature, uneven cooling, miscalibrated machinery, or improper molding material selection can lead to these imperfections, potentially lowering the plastic product’s look and function. Through plastic injection molding quality engineering, these defects can be significantly minimized or avoided.
Plastic injection molding quality engineering combines process control, materials science, design optimization, and defect detection processes.
IMS’s quality engineering ensures higher standards of plastic products, enhances manufacturing efficiency, and reduces waste thereby leading the path towards a more sustainable plastic industry. In this article, we will discuss the most common injection molding defects and how plastic molding companies like Integrated Molding Solutions implement quality engineering processes to prevent them.
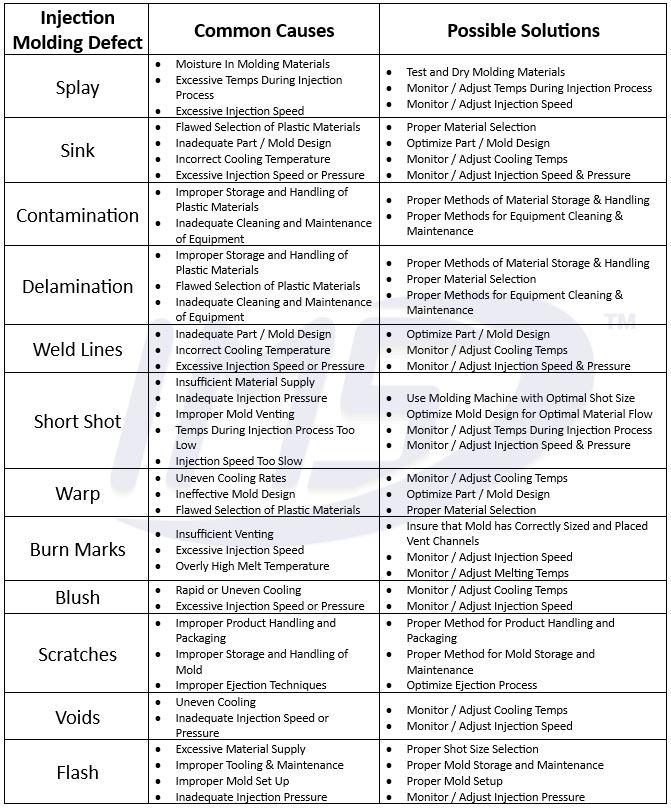
Common Plastic Injection Molding Defects Chart:
Common Injection Molding Defects: Splay
 What is Splay?
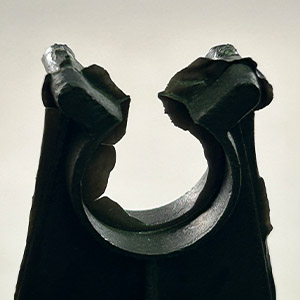
One of the most common injection molding defects is Splay, also referred to as “silver streaks” or “jetting”. Splay appears as a surface-level light or white streak on the plastic. Splay can be more obvious on black parts, but this plastic molding defect can be found in pretty much any injection molding material, any color.
Common Causes of Splay.
Generally what causes splay is moisture in the material. As we discussed in our material selection guide, some materials are hydroscopic, meaning they absorb moisture from the atmosphere. The moisture in the plastic resin is vaporized from the heat during the molding process. This causes tiny bubbles to become stretched out into streaks, as the plastic flows into the mold. This is why we run the material through dryers before it goes into the machines. Another potential cause of splay in plastic parts is excessive heat, either from high water/mold temps or shear heating during the injection process. If the plastic is injected into the mold too quickly, the high pressure can cause the material to overheat or volatize, which can also result in splay.
Common Solutions to Prevent Splay.
One way to prevent splay early is to test the material for moisture content. Then make sure dryers are drying to the level they need to prevent splay. Preventing splay also involves careful control over the molding process parameters, such as the melt temperature and injection speed. Making process adjustments to adjust the temperatures of the water and mold is another potential solution.
The Injection Molding Defect: Sink
 What is Sink?
 What is Sink?
Sink is a type of defect where depressions, or ‘sink marks’, appear in the finished product. Generally, this happens when the outer plastic material injected into the cavity cools and solidifies before the inner material. As the inner material cools, it contracts and pulls the already solidified outer material inward, creating a sink mark or indentation on the surface of the molded product.
Common Causes of Sink.
Sink marks are more likely to occur in thicker areas of the part, or where there is a transition from a thick section to a thin section, due to the difference in cooling rates in those areas. The material used, the molding process settings (such as injection speed and pressure, cooling time), and the design of the part (like wall thickness) all play a role in the occurrence of sink marks.
Common Solutions to Prevent Sink.
Quality engineering injection molding processes, such as proper part design (uniform wall thickness), precise control of process parameters, and the right selection of material can help to minimize or eliminate sink marks. Preventive solutions in part design can be coring out parts, reinforcing using ribs, and keeping consistent wall thickness. There are also several solutions that can be implemented in the injection molding process that can help prevent sink as well. First, adjust mold and water temperatures for optimal cooling. This allows the outside of the material to take longer to solidify. You can also adjust the injection and hold pressure if needed. Material solutions to sink can be changed to an injection molding material with a filler such as glass-filled nylon, talc-filled polypropylene, or carbon-filled polyethylene. These materials will help retain the structure of the molten plastic as it solidifies.
Injection Molding Defects: Contamination
 What is Contamination in injection molding?
Contamination in injection molding is the presence of any unwanted material or substance in the plastic resin or the molding machine that ends up in the molded part itself. This can significantly impact the quality and integrity of the finished product. Contaminants can be of various types of foreign material, such as degraded or undesired materials, dust, dirt, oil, or metal shavings.
When these contaminants get introduced into the injection molding machine during the molding process, they can create several defects in the finished product. These defects can range from minor visual issues like discoloration or surface blemishes to more severe problems like structural weaknesses leading to part failure.
Common Causes of Contamination.
Causes of contamination are simply when materials that are not desired in the current process are introduced to the process. Contaminants can get introduced into the plastic resin in several ways mainly poor handling/storage, resin mixing, and equipment wear and tear.
Common Solutions to Prevent Contamination.
Preventing contamination requires stringent control measures. There are several preventative actions for contamination. Integrated Molding Solutions implements a quality engineered control system consisting of regular cleaning and maintenance of the injection molding machine, proper storage and handling of the resin, using high-quality and correctly specified materials, and maintaining a clean molding environment.
When a material change happens there’s, an important process called purging that helps prevent contamination. Where we eject the plastic material that was previously molten inside the machine and get it out. You should purge your injection molding machine before and after a job start-up or a shift start-up. Purging compounds or certain materials can be used to help speed the process up.
There are a couple of different reasons to purge your molding machine. Contamination could be cross material, but it can also be from carbonized material. Carbonized material is when material sits in the heating chamber or the barrel of the machine for too long and starts to break down.
The Injection Molding Defect: Delamination
 What is Delamination?
Delamination in injection molding refers to a defect where thin layers or flakes appear on the surface of the molded part, which can often be peeled off.
Common Causes of Delamination.
One of the most common causes of delamination is contamination of plastic resin. If the resin is contaminated with another type of plastic, foreign particles, or even moisture, it can lead to areas within the part that do not bond correctly. If you have two dissimilar materials being injected in there, they’re not going to want to stick together, melt together, or stay together, they’re going to want to separate.
Common Solutions to Prevent Delamination.
To prevent delamination, it’s important to ensure that the resin is free from contaminants and that the molding process parameters (such as temperature, pressure, injection speed, and cooling rate) are correctly set and controlled.
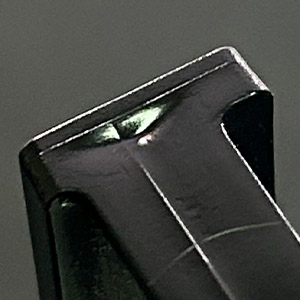
Common Injection Molding Defects: Weld Lines
 What are Weld Lines in plastic injection molding?
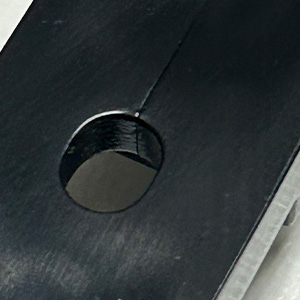
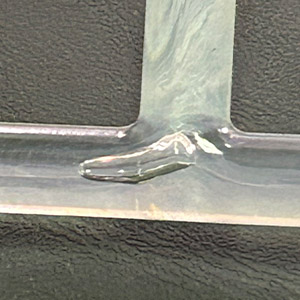
Weld lines, also known as knit lines, are a common defect in injection molding where two or more flow fronts of molten plastic meet but don’t properly fuse together. This happens when the molten plastic is injected into the mold cavity and flows around an obstacle such as a pin, hole, or protrusion, and then comes back together. The point where these separate flow fronts meet can cause a visible line or seam on the surface of the plastic part, appearing like stitch marks. These are sometimes confused with flow lines which are caused by varying material flow speed.
Common Causes of Weld Lines.
While weld lines are commonly mistaken as merely a cosmetic issue, in some cases, they can also create structural weaknesses in the molded part. Depending on the part’s design and its end-use requirements, the strength at the weld line can be significantly less than in the rest of the material, potentially leading to performance failure of the injection molded part.
Common Solutions to Prevent Weld Lines.
To minimize or eliminate weld lines, several strategies can be employed. These include modifying the part design to change the material flow of the molten plastic, adjusting the process parameters such as temperature and speed to ensure the plastic remains molten longer, and optimizing the placement of the gates. Material selection also plays a role, as some materials are more prone to weld line formation than others. Integrated Molding Solutions’ comprehensive understanding of plastic injection molding, quality engineering, and materials science is crucial in managing this challenge effectively.
The Injection Molding Defect: Short Shot
 What is a Short Shot?
A short shot is a defect in plastic injection molding where the molten material does not completely fill the injection mold cavity. This results in a plastic part that is not fully filled or incomplete compared to the intended design.
Common Causes of Short Shot.
Short Shot can occur for a variety of reasons, including insufficient material supply, inadequate injection pressure, or improper venting which prevents the material from completely occupying the cavity. Short shots can also be caused by a problem with the molding process parameters, such as the injection speed being too slow, allowing the plastic to cool and solidify before the mold is completely filled. Another possible cause is if the mold temperature is too low, causing the plastic to solidify prematurely.
Common Solutions to Prevent Short Shot.
Preventing short shots involves a thorough understanding of the injection molding process, the material being used, and the plastic part design. Adjustments to the process parameters, such as increasing the injection pressure or speed, or raising the mold temperature, can often help. In some cases, it may also be necessary to modify the design of the part or the gating system to ensure the molten plastic can flow and fill the mold cavity properly.
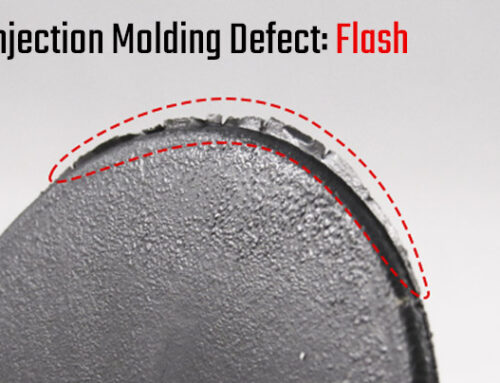
Common Injection Molding Defects: Flash
 What is Flash in Injection Molding?
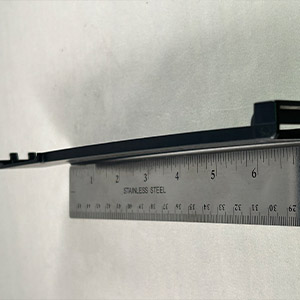
The opposite problem of short shots is flash. Flash, in injection molding, refers to the excess material that seeps out of the mold cavity during the injection process. This excess material then cools and solidifies along the parting line, around ejector pins, or any area where the two halves of the mold meet. On a finished part, this excess material appears as thin, flat protrusions, often resembling “webbing” or “burrs”, on the edges of the part.
Common Causes of Flash.
Flash is generally a sign of issues with the injection molding process or the mold itself. It can occur due to various reasons such as excessive injection pressure, too much material being injected, degradation of the mold over time leading to gaps between the mold halves, or improper alignment or clamping of the mold halves.
Common Solutions to Prevent Flash.
Besides affecting the form and function of injection molded parts, flash can also increase production time and costs, as it often needs to be manually trimmed off the molded part. Some parts may be internal or non-visible to the end user and forgo removing flash, however, if not prevented, this can be a costly aesthetic defect. Therefore, preventing and controlling flash is an important aspect of injection molding quality engineering. This can involve optimizing the molding process parameters, performing regular maintenance and alignment of the molds, and using high-quality molds that can withstand the pressures of the molding process without degrading or warping.
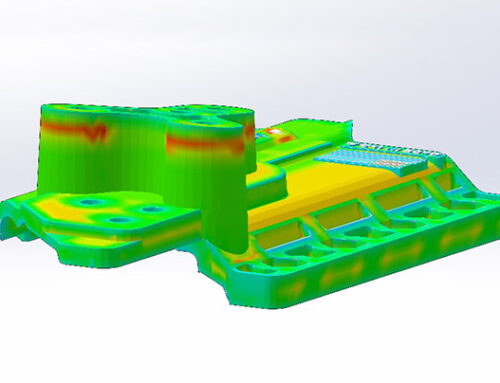
The Injection Molding Defect: Warp
 What is Warp?
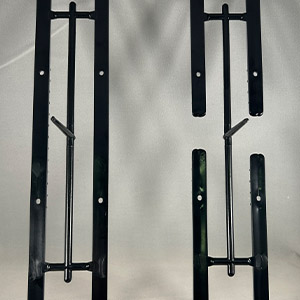
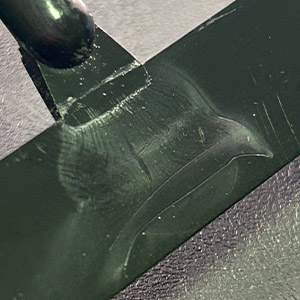
Another common injection molding defect is warp. Warping is a defect that results in the distortion of the shape of a plastic part that is apparent after it has been ejected from the mold. Essentially, the part does not maintain its intended shape and dimensions, but rather, bends, twists, or otherwise deforms, making it unsuitable for its intended use.
Common Causes of Warp.
Typically, warping occurs due to differential cooling rates across the part. If different sections of a part cool and solidify at different rates or times, internal stress “stress creep” can build up and lead to distortion after it’s ejected from the mold. This is especially common in parts with uneven wall thicknesses or complex designs. Other factors that can cause warping are the type of plastic material used (as different plastics have different shrinkage rates), the injection process parameters (like injection speed, pressure, and temperature), and the design of the mold itself. Semicrystalline materials are most likely to warp, but you can also see amorphous plastic materials warp as Polymer chains start to align a certain way.
Common Solutions to Prevent Warp.
Solutions to prevent or address warping start with careful part and mold design, and precise control over the molding process. Quality engineering in plastic injection molding focuses on these aspects to minimize the occurrence of warping and ensure the production of high-quality, accurate plastic parts. A simple design preventative action to prevent stress creep from causing excessive warping is making sure that the part has plenty of support ribs. A Process solution to prevent warp can be to alter the temperature. Altering the mold temperatures, the temperature of the water running through the molds, and having one mold half a different temperature than the other can all be solutions depending on the warping cause.
Injection Molding Defects: Burn Marks
 What are Burn Marks?
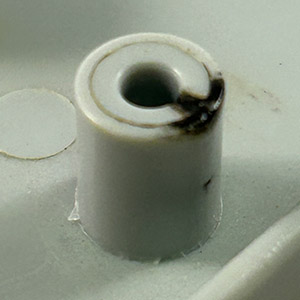
Another example of injection molding defects are burn marks, and they look exactly like that. You’ll see them most drastically on lighter plastic parts, but you can still see them on darker or even black parts, as they are charred areas of the part. Burn Marks can form for several reasons. As plastic is injected into the mold cavity, there is air already in the cavity, which ideally is forced out of the mold through designing venting features. Generally, when burn marks occur, if the air is not able to escape, it is compressed and superheated which can burn the plastic. Another type of burn mark occurs when the plastic material overheats during the injection process, leading to thermal degradation of the plastic “burn mark”.
Common Causes of Burn Marks.
Burn mark defects can be caused by multiple factors through the injection molding process. The first cause of this injection molding defect is insufficient venting, which causes trapped air. Second, Excessive injection speed can cause burn marks for two reasons. When the plastic material is injected into the mold too quickly, the shearing force can generate excessive heat and cause burning, or the injection speed can also be too fast to allow the air to properly dissipate. The third common cause of burn marks is high melt temperature. If the plastic material is heated to a temperature higher than its recommended melt temperature, it can degrade and burn.
Common Solutions to Prevent Burn Marks.
These issues can be addressed by carefully controlling the injection molding process parameters, including injection speed, barrel temperature, and residency time, and by ensuring that molds are properly designed and vented. Regular maintenance of the injection molding equipment and the use of appropriate plastic materials can also help prevent burn marks. Quality engineering in plastic injection molding plays a crucial role in monitoring and controlling these factors to minimize defects like burn marks and produce high-quality plastic parts.
Common Injection Molding Defects: Voids
 What are Injection Molding Voids?
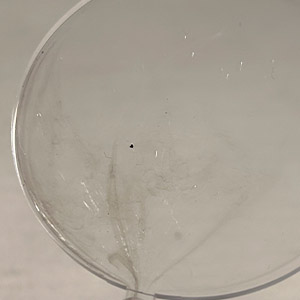
Plastic injection molding voids are air pockets within a molded plastic part. Voids are hollow sections that can compromise the structural integrity and appearance of the final product, impacting form, fit, and function. Unless the part is transparent or a water-clear part, you probably won’t see a void until the part breaks because voids are below the surface of the part.
Common Causes of Voids.
Voids typically occur due to a few reasons. Voids are similar to sink, but rather than the material pulling inward from the surface in sink, voids are caused by the material pulling outward from the center, holes below the surface of the part. Excessive injection speed can also cause trapped air or gas which does not leave the mold. This creates air pockets leading to a void, as well as burn marks. Uneven cooling can cause a similar outcome, where the part is shrinking at a different rate. This is often seen around sections of the injection mold with overly large wall thicknesses.
Common Solutions to Prevent Voids.
Ensuring proper venting, optimal injection pressures and speeds, and careful mold/part design can minimize the occurrence of voids. Quality engineering in plastic injection molding plays an integral role in managing these variables, significantly reducing void formation, and ensuring the production of high-quality, defect-free parts.
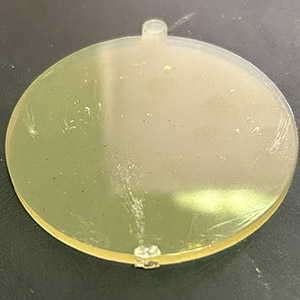
The Injection Molding Defect: Blush
 What is Injection Molding Blush?
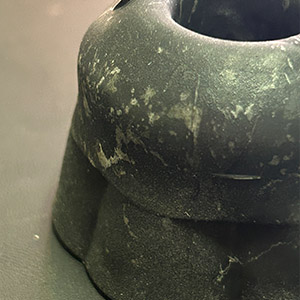
In plastic injection molding, blush is a cloudy or foggy discoloration on the surface of a molded part, giving it a different appearance on the surface than in other areas of the part. It’s generally found around the gate, or “injection point into the cavity”.
Common Causes of Blush.
Blush typically happens when moisture, trapped air, or volatiles in the plastic material evaporate and cool rapidly, causing the plastic to crystallize in disorder. It’s usually caused by one or more of the following factors. Rapid or uneven cooling can lead to blushing, as it does not allow the plastic to solidify in an orderly crystalline structure. Lastly, if the molten plastic is injected into the mold too quickly, it can cause excessive shearing and lead to blushing.
Common Solutions to Prevent Blush.
To prevent blush, ensure the plastic resin is thoroughly dry before molding, control the cooling process, and adjust the injection speed as needed. Quality engineering in plastic injection molding involves optimizing these parameters to minimize defects like blushing, thereby ensuring the production of high-quality, aesthetically pleasing parts.
Common Injection Molding Defects: Scratches
 What are Injection Molding Scratches?
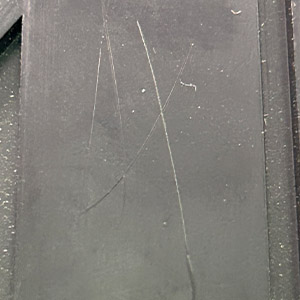
Scratches are surface defects that manifest as line-like marks or abrasions on the finished plastic part. These injection molding defects detract from the aesthetic quality of the product and can also affect the performance of the product.
Common Causes of Scratches.
Scratch Defects, also grouped with scuff marks or oil marks, are generally caused when some sort of contamination impacts the part after it is molded. They can also occur in production if the surface of the mold itself has rough spots, sharp edges, or is not properly polished. This can cause the plastic part to be marked during the injection or ejection process. Issues with the ejection system, such as Insufficient or uneven force, or poorly placed ejector pins can cause scratch as well. Lastly, Scratches can also be inflicted during handling, storage, transport, or any subsequent processing or assembly operations.
Common Solutions to Prevent Scratches.
To avoid scratches 1) maintain the mold in good condition, 2) optimize the part ejection process, and 3) handle the finished parts correctly. Integrated Molding Solution’s robust quality system and our trained operators spot and prevent scratches from happening in the 1st place. To prevent these parts from knocking into each other and avoid scratches use good part transportation techniques. This can include utilizing conveyor belts, ramps, boxing, and robots in the plastic product manufacturing processes. Quality engineering plays a vital role in plastic injection molding to minimize the occurrence of scratches and ensure the production of high-quality, defect-free parts.
An Experienced Plastic Injection Molding Company that proactively knows how to avoid injection molding defects from the start.
At Integrated Molding Solutions, quality and precision are some of the most important factors when manufacturing for our customers. Our quality control methods start from the initial design phase, through the production process, and to how we package and ship your finished product. With over 20 years of experience in plastic manufacturing, our team will work with you to optimize not only the molding process and mold, but even product design to maintain form, fit, and function while proactively minimizing the risk of defects. No longer worry about injection molding defects, and partner with IMS for your precision injection molding needs. Contact us today for additional information.